Picture this: the kitchen is a chaotic symphony of sizzling pans, a rolling pin that refuses to cooperate, and a neighbor’s dog barking at the door. I was on the brink of a culinary catastrophe, trying to salvage a pie that had already gone a little too far into the “over‑baked” zone. That moment was the catalyst for discovering the Apple Slab Pie: The Ultimate E, a recipe that turned my disaster into a triumph. The aroma that hit my nose—warm apple, cinnamon, and buttery crust—was an instant reminder that the right technique can save even the most dire of dishes.
I’ve spent countless evenings staring at a stack of apple pies that looked more like a pile of over‑cooked dough than a dessert. The texture was either too dense or too watery, the sweetness either too overpowering or too faint, and the crust never quite hit that golden, flaky perfection. I tried everything: double‑baking, blind‑baking, adding cornstarch, but each attempt ended in disappointment. That was until I stumbled upon a method that balances the crust and filling like a perfectly choreographed dance, where each ingredient has its moment to shine.
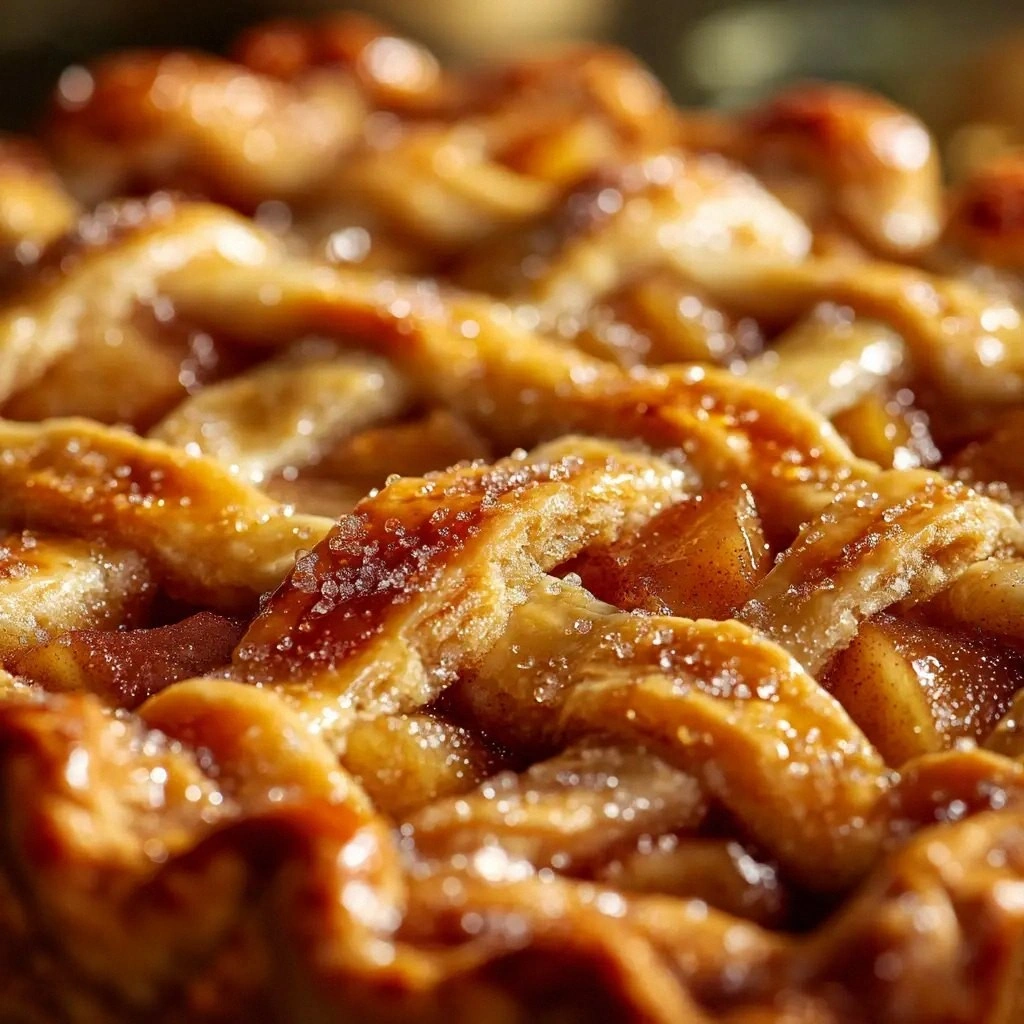
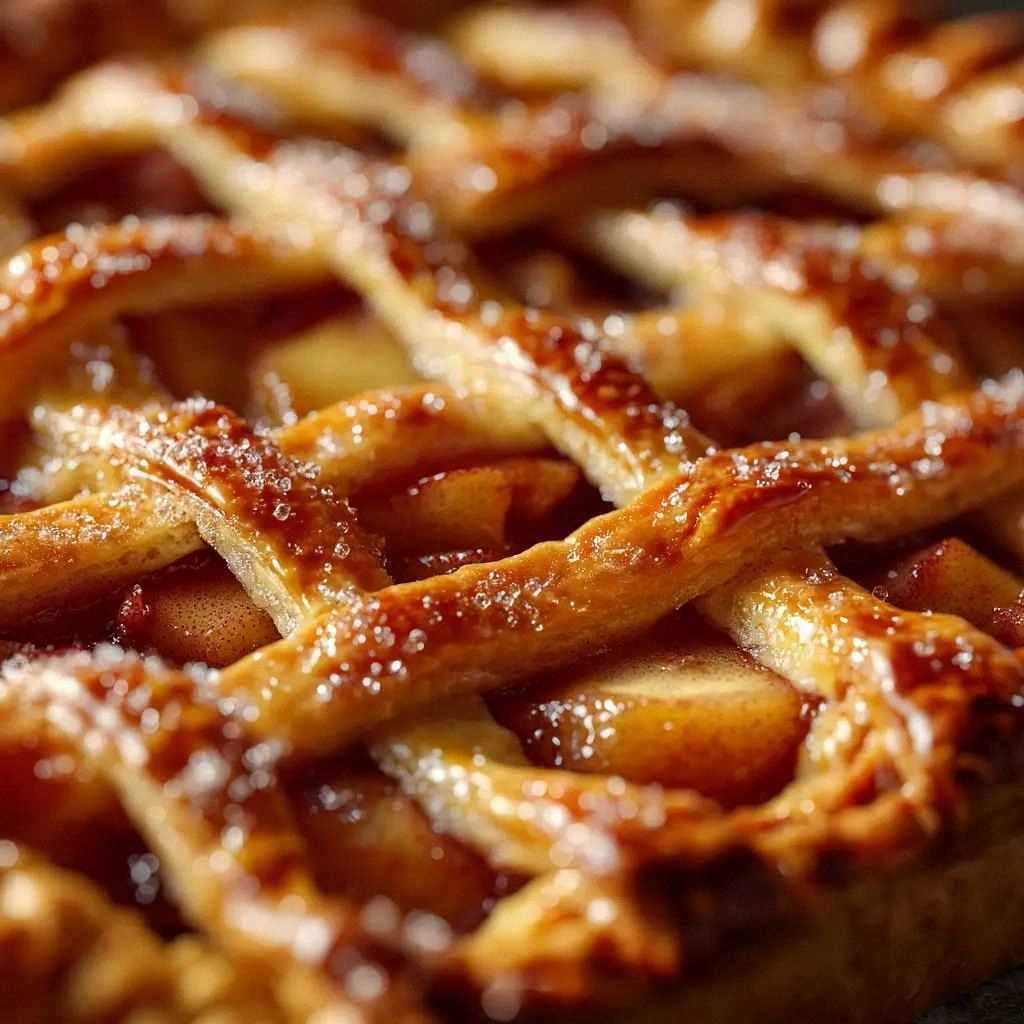
What sets this version apart is not just the flawless execution but the subtle twists that elevate the classic apple pie into a showstopper. The crust is a buttery, flaky masterpiece that crumbles like a snowflake, while the filling is a sweet, spiced tapestry that sings with every bite. I dare you to taste this and not go back for seconds—because the first bite will have you questioning how you ever settled for anything else. The secret? A carefully calibrated ratio of flour to butter, a touch of lemon juice to brighten the apples, and a sprinkle of coarse sugar on top that caramelizes into a crunchy crown.
I’ll be honest—when I first baked this pie for a family gathering, I ate half the batch before anyone else got a chance to try it. The aroma filled the house, and everyone lined up for a slice. The crowd reaction was electric: “Where did you learn this?” “It’s like a slice of autumn in every bite.” That’s the power of a well‑balanced recipe. Picture yourself pulling this out of the oven, the whole kitchen smelling incredible, the crust golden and the filling bubbling with a caramelized, spiced scent that makes your heart skip a beat. Let me walk you through every single step—by the end, you’ll wonder how you ever made it any other way.
What Makes This Version Stand Out
- Flaky Perfection: The crust achieves a buttery, flaky texture that melts in your mouth. The ratio of flour to butter is precisely calibrated to give the dough just enough structure without compromising tenderness.
- Balanced Sweetness: With ¾ cup of granulated sugar and ¼ cup of brown sugar, the filling hits the sweet spot—sweet enough to satisfy cravings, but not so sweet that it overwhelms the apple’s natural tartness.
- Texture Contrast: The coarse sugar topping caramelizes into a crisp, golden crown, adding a delightful crunch against the soft, spiced interior.
- Ingredient Quality: Using fresh, firm apples and cold, cubed butter ensures the best flavor and texture. Freshness is the cornerstone of this recipe’s success.
- Make‑Ahead Friendly: The pie can be assembled a day in advance and baked fresh. This feature makes it ideal for holidays and busy weekends.
- Crowd‑Pleaser: Whether you’re serving a family or a gathering, the pie’s generous size and robust flavor guarantee it will be a hit.
Alright, let’s break down exactly what goes into this masterpiece…
Inside the Ingredient List
The Flavor Base
The 8 medium apples are the heart of this pie. Opt for a blend of sweet and tart varieties—such as Honeycrisp, Gala, and Granny Smith—to create depth of flavor. Thinly sliced, they allow the spices to penetrate each piece, ensuring a balanced taste in every bite. If you skip the apples, you lose the juicy, aromatic core that makes this pie unforgettable.
The Texture Crew
The crust’s texture hinges on the 3 cups of all‑purpose flour and 1 cup of cold, cubed butter. The flour provides structure, while the butter delivers richness and flakiness. If you use melted butter, the dough will become tough, so always keep it cold. A small tip: chill the dough for at least 30 minutes before rolling; this prevents shrinkage during baking.
The Unexpected Star
Lemon juice is the unsung hero that brightens the apple filling. A tablespoon of lemon juice adds a subtle tartness that counterbalances the sweetness, preventing the filling from becoming cloying. Without it, the pie can feel flat. If you’re allergic to citrus, a splash of apple cider vinegar can provide a similar lift.
The Final Flourish
Coarse sugar on top caramelizes into a crunchy, golden crown that offers a delightful contrast to the soft interior. It also creates a visual appeal that makes the pie Instagram‑worthy. If you prefer a softer top, simply omit the coarse sugar, but be prepared to sacrifice that signature crunch.
Everything’s prepped? Good. Let’s get into the real action…
The Method — Step by Step
- Gather all crust ingredients and combine the flour, granulated sugar, and salt in a large bowl. In a separate bowl, cut the cold butter into small cubes and add it to the dry mix. Using a pastry cutter or your fingertips, work the butter into the flour until the mixture resembles coarse crumbs. This is the moment of truth—if the butter is too warm, the dough will be soggy.
- Add the ice water a tablespoon at a time, mixing gently after each addition. Once the dough starts to come together, form it into a ball, flatten into a disk, wrap in plastic, and refrigerate for at least 30 minutes. Chill time is essential for a flaky crust.
- Meanwhile, prepare the filling. In a large bowl, combine the thinly sliced apples, ¾ cup granulated sugar, ¼ cup brown sugar, ¼ cup flour, cinnamon, nutmeg, ⅛ teaspoon salt, and lemon juice. Toss until the apples are evenly coated. The flour helps thicken the filling, preventing it from becoming a soggy mess.
- Preheat your oven to 375°F (190°C). On a lightly floured surface, roll out the chilled dough to fit a 9‑inch pie pan. Carefully transfer the dough to the pan, pressing it into the corners and trimming any excess. This step ensures a snug fit and a beautiful edge.
- Pour the apple filling into the crust, spreading it evenly. Dot the top with 2 tablespoons of unsalted butter cut into small pieces. The butter melts into the filling, creating pockets of buttery richness that contrast with the spices.
- Cover the edges with a strip of foil or a second crust to prevent over‑browning. Bake for 35 minutes, or until the filling is bubbling and the crust is golden brown. The bubbling indicates the sugars are caramelizing, creating that rich, caramelized flavor.
- Remove the pie from the oven and let it rest on a rack for at least 15 minutes. Resting allows the filling to set, preventing a runny mess when sliced. The aroma during this time is the ultimate teaser for the next step.
- Slice and serve warm, optionally with a scoop of vanilla ice cream or a dollop of whipped cream. The contrast between the warm, spiced filling and the cold, creamy topping is pure bliss. That sizzle when it hits the pan? Absolute perfection.
That's it—you did it. But hold on, I've got a few more tricks that'll take this to another level…
Insider Tricks for Flawless Results
The Temperature Rule Nobody Follows
Many bakers bake their pies at 350°F, but this recipe calls for 375°F to achieve that perfect golden crust. The higher temperature creates a crisp exterior while keeping the interior moist. I once baked at 350°F, and the crust turned out pale and doughy. Stick to 375°F and you’ll get that coveted crunch.
Why Your Nose Knows Best
During the first 20 minutes of baking, the scent of caramelizing sugar and spices will fill the kitchen. Trust your nose—when you smell a sweet, buttery aroma, the pie is almost ready. This sensory checkpoint saves you from over‑baking and ensures a perfect finish.
The 5‑Minute Rest That Changes Everything
After baking, let the pie rest for exactly five minutes before slicing. This brief pause allows the filling to set, preventing it from sliding off the crust. I’ve seen people cut straight out of the oven, only to have the filling spill. The five‑minute rest is a simple but game‑changing step.
Use a Pie Shield for Even Baking
If you’re prone to over‑browned edges, cover the crust with foil or a pie shield. This protects the edges while allowing the filling to bubble and caramelize. The result is a perfectly baked pie with no burnt corners.
Freeze for a Quick Breakfast
Cut the pie into slices, wrap them in foil, and freeze. When you’re in a rush, pop a slice in the microwave for 30 seconds. The warm, gooey filling and flaky crust will still hit the spot. It’s a breakfast hack that saves time and satisfies cravings.
Creative Twists and Variations
This recipe is a playground. Here are some of my favorite ways to switch things up:
Spiced Pumpkin Twist
Swap half the apples for pumpkin puree and add 1 teaspoon of pumpkin pie spice. The result is a warm, autumnal pie that feels like a hug in dessert form. It’s perfect for Thanksgiving or any fall gathering.
Nutty Crunch Variation
Incorporate ½ cup chopped pecans or walnuts into the filling. The nuts add a delightful crunch and a nutty flavor that complements the spices. Toast the nuts before adding for an extra layer of depth.
Caramel Apple Delight
Drizzle caramel sauce over the filling before baking. The caramel caramelizes, creating a glossy, sweet topping that adds both flavor and visual appeal. It’s a decadent twist that turns the pie into a showstopper.
Gluten‑Free Adaptation
Use a 1:1 gluten‑free flour blend to replace the all‑purpose flour. Keep the rest of the recipe unchanged for a gluten‑free version that still delivers on taste and texture. The crust may be slightly denser, but the flavor remains intact.
Low‑Sugar Option
Reduce the granulated sugar to ½ cup and increase the apple quantity to 10. The natural sweetness of the apples will carry the pie, making it a lighter, healthier dessert. The spices keep the flavor profile rich.
Mini Pie Bites
Roll the dough into small circles and fill them with apple slices. Bake at 375°F for 15 minutes. These bite‑sized treats are perfect for parties or as a fun snack. They’re easy to handle and taste just as good as the full pie.
Storing and Bringing It Back to Life
Fridge Storage
Store the pie in an airtight container at room temperature for up to 3 days. If you need to refrigerate, wrap it tightly in plastic wrap to prevent drying out. When you’re ready to serve, let it sit at room temperature for 15 minutes to bring back its warm aroma.
Freezer Friendly
Wrap the pie slice or whole pie in parchment paper, then in foil, and freeze for up to 2 months. To thaw, let it sit at room temperature for 2 hours. The texture remains flaky, and the filling stays juicy.
Best Reheating Method
Reheat in a preheated oven at 350°F for 10 minutes, or microwave on medium for 30 seconds. Add a splash of water before reheating to steam the filling back to perfection. This trick preserves moisture and flavor.