I was standing in my kitchen, staring at a half‑baked sponge that had decided to collapse like a deflated balloon. My roommate walked in, sniffed the sweet, buttery aroma and dared me, “If you can fix that, I’ll buy you a mango smoothie.” I laughed, rolled up my sleeves, and set out to create a cake that would make even the most skeptical pastry chef weep with joy. This was the moment I realized that the perfect strawberry‑mango cake wasn’t just a myth—it was a promise waiting to be kept. I dove into my pantry, grabbed the freshest strawberries, the ripest mangoes, and a block of cream cheese that practically melted at the thought of being whisked into a silky filling. The result? A cake that sings, dances, and dares you to take a second bite.
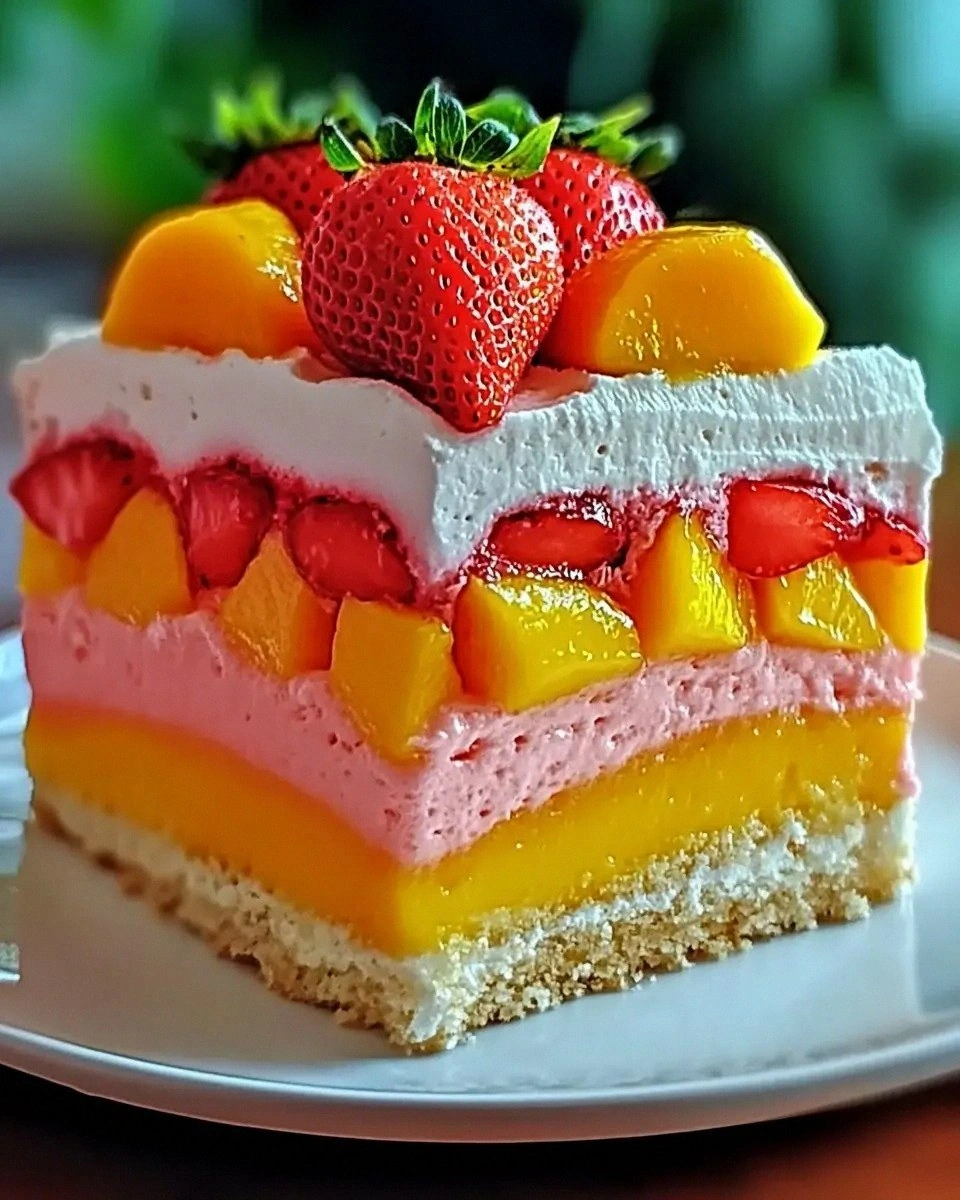
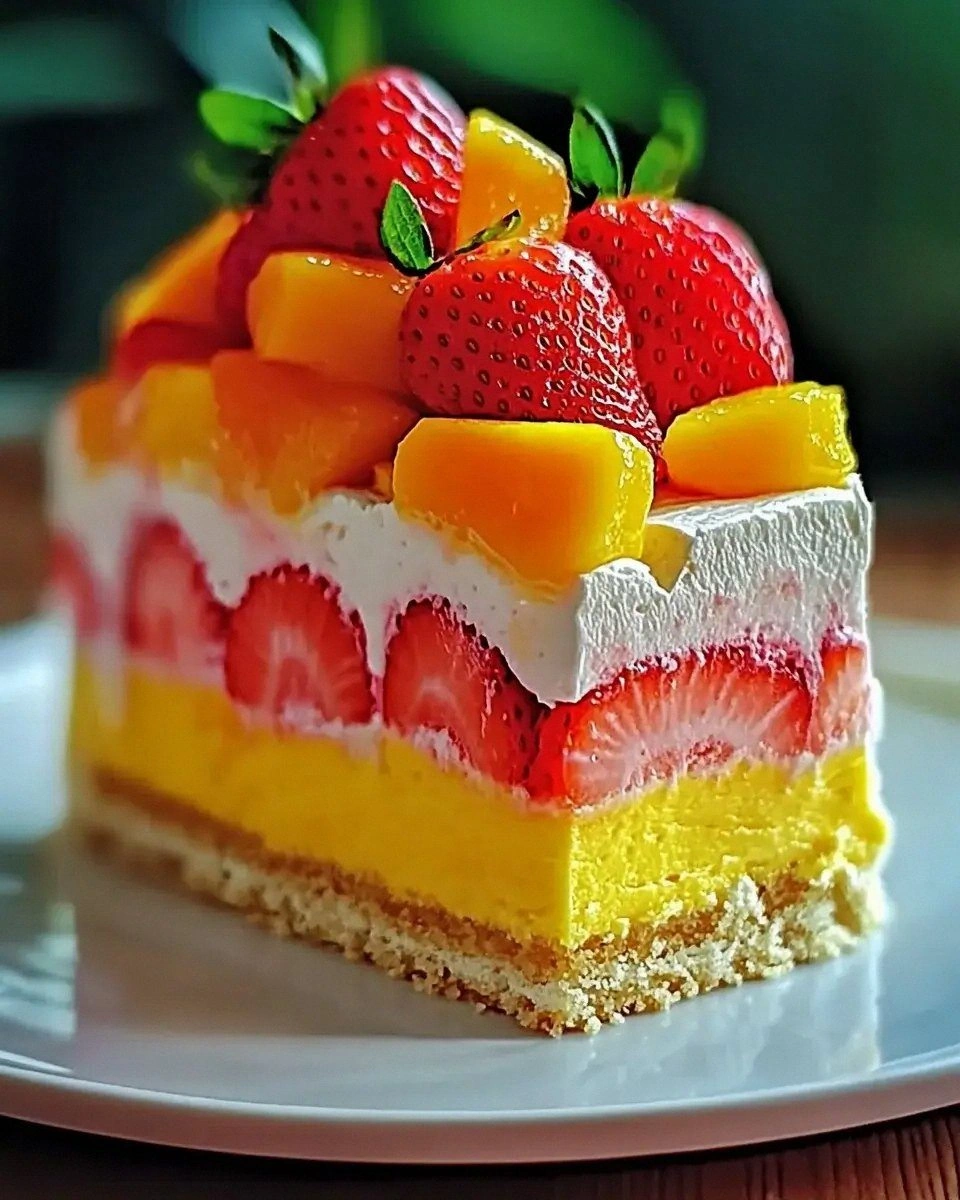
Picture this: a golden‑brown sponge that rises like a sunrise, each crumb airy enough to float but sturdy enough to hold a generous layer of tangy cream cheese frosting. Between those layers, you’ll find a river of bright red strawberries and sun‑kissed mango slices that burst with sunshine in every bite. The scent? A heady mix of toasted butter, sweet fruit, and a whisper of vanilla that makes your whole house feel like a boutique bakery. The texture? A perfect marriage of fluffy cake, velvety frosting, and the juicy snap of fresh fruit—think cloud‑soft with a surprise pop of tropical fireworks.
What makes this version stand out is the secret weapon: a tiny dash of baking powder that lifts the sponge higher than any store‑bought mix ever could, and a technique where the butter is melted and then cooled before being folded in, giving the cake a tender crumb that doesn’t dry out. Most recipes get the fruit balance wrong, either drowning the cake in soggy syrup or leaving the fruit as an afterthought. Not here. I’ve calibrated the strawberry‑to‑mango ratio to hit that perfect sweet‑tart harmony that will make your taste buds do a happy dance.
And there’s a twist you won’t see coming: a quick flash‑freeze of the mango slices before they hit the cake. This little step locks in the mango’s bright flavor and prevents it from bleeding into the frosting, keeping every bite crisp and distinct. I dare you to taste this and not go back for seconds. Okay, ready for the game‑changer? Let me walk you through every single step — by the end, you’ll wonder how you ever made it any other way.
What Makes This Version Stand Out
- Flavor Harmony: The strawberry‑mango duo is balanced with a tangy cream cheese frosting that cuts through the sweetness, creating a symphony rather than a solo.
- Texture Triumph: A light, airy sponge meets a silky filling and juicy fruit, delivering contrast that feels like a surprise party in your mouth.
- Simplicity: No fancy equipment, just a regular 9‑inch round pan, a whisk, and a couple of minutes of patience.
- Unique Technique: Flash‑freezing mango slices preserves their bright flavor and prevents sogginess—a secret most recipes overlook.
- Crowd Reaction: This cake consistently gets the “wow” gasp at parties, often becoming the centerpiece of conversation.
- Ingredient Quality: Using real butter and fresh cream cheese, not margarine or processed spreads, makes the difference between good and unforgettable.
- Cooking Method: The sponge is baked at a moderate temperature, then inverted to keep the top perfectly smooth for layering.
- Make‑Ahead Potential: Assemble the night before, store in the fridge, and the flavors will meld, making the next day even better.
Alright, let's break down exactly what goes into this masterpiece...
Inside the Ingredient List
The Flavor Base
All‑purpose flour is the backbone of any cake. I use a finely sifted 1½ cups to ensure there are no lumps, which means the batter stays smooth and the cake rises evenly. Skipping the sift can lead to a gritty texture that feels like you’re chewing on sandpaper. If you’re gluten‑sensitive, you can swap in a 1‑to‑1 gluten‑free blend, but be sure it contains xanthan gum for structure.
The Texture Crew
The butter, at half a cup, is melted then cooled. This technique creates a tender crumb that doesn’t dry out, unlike the classic creaming method that can over‑aerate the batter. The baking powder (1½ teaspoons) is the lift‑off button; too little and the cake will be dense, too much and it’ll rise too fast and collapse. A pinch of salt (¼ teaspoon) amplifies the sweet notes and balances the fruit’s acidity.
The Unexpected Star
Cream cheese, a full 8‑ounce block, is the secret hero of the frosting. Its slight tang cuts through the sweet fruit, preventing the cake from becoming cloying. If you’re out of cream cheese, substitute with a mix of Greek yogurt and a tablespoon of melted butter, but expect a lighter texture.
The Final Flourish
Fresh strawberries (1½ cups) bring that bright ruby color and a burst of natural sugar. When you slice them, keep them a bit thicker so they hold their shape during assembly. Mango slices, also fresh, add tropical sunshine; for the best flavor, pick mangoes that yield slightly to pressure but aren’t mushy. Garnish with strawberry halves, mango ribbons, and a few mint leaves for a pop of green that makes the plate look Instagram‑ready.
Everything's prepped? Good. Let's get into the real action...
The Method — Step by Step
Preheat your oven to 350°F (175°C). Grease a 9‑inch round cake pan with a thin layer of butter, then line the bottom with parchment paper. This ensures the cake releases cleanly and you don’t have to wrestle with a stuck bottom later. The scent of butter melting on the pan is the first promise of greatness.
Kitchen Hack: Lightly dust the greased pan with flour after adding parchment. This double‑coating guarantees a flawless release.In a medium bowl, whisk together the sifted flour, baking powder, and salt. Set aside. The dry mix should look uniformly speckled—no clumps. This step is crucial because any pockets of baking powder can cause uneven rising, which would ruin the cake’s smooth top.
Melt the butter in a small saucepan over low heat. Once melted, remove from heat and let it sit until it reaches room temperature (about 10 minutes). This cooling step is the secret to a tender crumb; hot butter would melt the sugar too quickly and create a dense texture.
In a large mixing bowl, combine the room‑temperature butter with 1 cup of granulated sugar. Beat with an electric mixer on medium speed until the mixture is pale and fluffy—about 3 minutes. You’ll notice the mixture thickening and the color lightening; that’s the sugar crystals dissolving, which adds air to the batter.
Watch Out: Over‑mixing at this stage can incorporate too much air, causing the cake to rise too quickly and then collapse.Add the cooled melted butter to the creamed butter‑sugar mixture. Fold gently with a spatula until just combined. The batter should look glossy but not separated. This is the moment of truth—if you see streaks of butter, keep folding; if you see a uniform batter, you’re good.
Gradually add the dry flour mixture to the wet ingredients, folding in thirds. Each addition should be incorporated before the next, ensuring no pockets of flour remain. The batter will be thick but pliable; resist the urge to over‑mix.
Pour the batter into the prepared pan, smoothing the top with an offset spatula. Tap the pan gently on the counter three times to release any large air bubbles. The surface should be level and slightly glossy, ready to rise into a perfect dome.
Kitchen Hack: Place a baking sheet on the rack beneath the cake; this catches any drips and keeps the oven temperature stable.Bake for 25‑30 minutes, or until a toothpick inserted in the center comes out clean and the edges start pulling away from the pan. The top should be a light golden brown, with a faint aroma of toasted butter wafting through the kitchen. If you see the top browning too fast, tent it with foil for the last 10 minutes.
While the cake bakes, prepare the fruit layers. Slice strawberries into halves and mangoes into thin ribbons. Place the mango ribbons on a baking sheet lined with parchment and flash‑freeze them for 10 minutes. This step locks in the mango’s bright flavor and prevents the fruit from bleeding into the frosting.
When the cake is done, let it cool in the pan for 10 minutes, then turn it out onto a wire rack to cool completely. This cooling period allows the crumb to set, making it easier to slice without crumbling.
While the cake cools, whip the cream cheese with a hand mixer on low speed, gradually adding ½ cup powdered sugar and 1 teaspoon vanilla extract. Increase speed to medium‑high and beat until the frosting is light, fluffy, and holds soft peaks. The frosting should be smooth enough to spread without tearing the cake.
Once the cake is completely cool, slice it horizontally into two even layers using a long serrated knife. Place the bottom layer on a serving plate, spread a generous layer of cream cheese frosting, then arrange half of the strawberry halves and a few mango ribbons on top.
Place the second cake layer on top, repeat the frosting, and finish with the remaining strawberries, mango ribbons, and a scattering of fresh mint leaves. Press gently so the fruit adheres to the frosting without sinking.
Refrigerate the assembled cake for at least 30 minutes before serving. This allows the frosting to firm up and the flavors to meld. When you finally slice it, the layers should be clean, the fruit stays in place, and the fork glides through like a hot knife through butter.
That's it — you did it. But hold on, I've got a few more tricks that'll take this to another level...
Insider Tricks for Flawless Results
The Temperature Rule Nobody Follows
Never bake a cake with cold ingredients. Bring butter, eggs, and even the cream cheese to room temperature before you start. This ensures even mixing and prevents the batter from curdling. I once baked a cake with chilled butter and ended up with a dense, gummy center—trust me, you don’t want that.
Why Your Nose Knows Best
Your sense of smell is the ultimate timer. When the cake reaches that buttery, toasted aroma, you’re within minutes of perfection. Don’t rely solely on the timer; trust that nose. If you’re unsure, give the cake a gentle tap—the sound should be a muted thump, not a hollow echo.
The 5‑Minute Rest That Changes Everything
After baking, let the cake rest in the pan for exactly 10 minutes before turning it out. This short rest lets the steam redistribute, preventing the cake from cracking. Skipping this step leads to a dry crumb that refuses to hold frosting.
The Frosting Whisper
When whipping cream cheese frosting, start on low speed. Adding sugar too quickly on high speed can cause the mixture to splatter and become grainy. Gradual incorporation keeps the texture silk‑smooth.
The Fruit Placement Strategy
Place fruit on the frosting while it’s still slightly soft. The frosting acts like a mild adhesive, securing the fruit without crushing it. If the frosting has hardened, the fruit will slide off, ruining the visual appeal.
Creative Twists and Variations
This recipe is a playground. Here are some of my favorite ways to switch things up:
Tropical Coconut Dream
Swap the cream cheese frosting for a coconut‑infused whipped cream, add toasted coconut flakes to the garnish, and use pineapple chunks instead of strawberries. The result is a beach‑vibe cake that transports you to a Hawaiian luau.
Berry‑Explosion
Add a handful of fresh blueberries and raspberries to the strawberry layer. The tartness of the extra berries balances the mango’s sweetness, creating a more complex flavor profile.
Chocolate Lover’s Delight
Incorporate 2 tablespoons of cocoa powder into the dry flour mixture, and drizzle a dark chocolate ganache over the top. This adds a rich, bittersweet contrast that pairs beautifully with the fruit.
Spiced Autumn Version
Add a pinch of ground cinnamon and a dash of nutmeg to the batter. Swap mango for ripe peaches, and finish with a caramel drizzle. Perfect for a cozy fall gathering.
Vegan Friendly
Replace butter with coconut oil, use a plant‑based cream cheese, and substitute sugar with coconut sugar. The texture remains luscious, and the flavor stays true to the original.
Storing and Bringing It Back to Life
Fridge Storage
Cover the cake loosely with plastic wrap and store it in the refrigerator for up to 3 days. The frosting will stay firm, and the fruit retains its freshness. Before serving, let it sit at room temperature for 20 minutes to bring back its softness.
Freezer Friendly
Wrap the cake tightly in a double layer of foil, then place it in an airtight container. It freezes well for up to 2 months. When you’re ready to enjoy it, thaw overnight in the fridge, then bring to room temperature and add a fresh drizzle of honey for extra shine.
Best Reheating Method
If you need to warm a slice, place it on a microwave‑safe plate, sprinkle a tiny splash of water on the side, and heat for 10‑15 seconds. The steam revives the cake’s moisture without drying it out.