I was standing in my kitchen, mid‑Monday, staring at a half‑finished chocolate cake that had somehow turned into a charcoal disaster. The smoke alarm sang its high‑pitched warning while my roommate shouted, “What on earth are you doing?” I laughed, wiped the flour from my cheek, and thought, “If I can’t rescue this cake, maybe I can rescue my cravings with something even better.” That moment sparked a daring experiment: a milkshake that would taste like a whole chocolate‑peanut‑butter pie in a glass. I grabbed a tub of vanilla ice cream, a jar of peanut butter, and a bottle of chocolate syrup, and the rest was pure, chaotic magic.
Picture the scene: the kitchen counter glistening with a thin sheen of melted chocolate, the air thick with the sweet perfume of roasted peanuts, and the faint crunch of graham crackers echoing like distant applause. The blender whirred, a low‑rumble that felt like a secret engine revving up for a race. My spoon dove into the mixture, and the first sip hit my tongue with the silky smoothness of a classic milkshake, instantly followed by the rich, nutty punch of peanut butter and the faint, buttery crumble of a pie crust. The texture was a perfect marriage of creamy, velvety, and just‑a‑bit‑crunchy—like biting into a cloud that had been toasted on the inside.
Why does this version blow every other milkshake recipe out of the water? Most recipes treat a milkshake as a simple blend of ice cream and milk, forgetting the power of texture and depth. I dared to add crushed graham crackers, because a pie crust isn’t just a garnish; it’s the backbone of flavor that turns a drink into a dessert experience. I also tossed in a whisper of cream cheese for that tangy richness you’d expect from a real chocolate‑peanut‑butter pie, and topped it with whipped cream and roasted peanuts for that final, Instagram‑worthy flourish. The result? Hands down the best version you’ll ever make at home—no fancy equipment, just a blender and a few pantry heroes.
Now, I’m going to spill the beans (and the peanuts) on the one technique that makes this shake stand out: a quick toast of the graham crackers before crushing them. This simple step unlocks a caramelized, buttery note that you simply can’t get from raw crumbs. I dare you to taste this and not go back for seconds. Let me walk you through every single step — by the end, you’ll wonder how you ever made it any other way.
What Makes This Version Stand Out
- Flavor Fusion: The blend of chocolate, peanut butter, and toasted graham crackers creates a layered taste profile that mimics a full‑pie in a glass.
- Texture Play: Creamy ice cream meets crunchy cracker crumbs, delivering a mouthfeel that’s both smooth and satisfyingly crunchy.
- Simplicity: Only a handful of ingredients, all pantry‑friendly, mean you can whip this up in under ten minutes.
- Visual Wow Factor: Swirls of chocolate syrup and a crown of whipped cream make it look like a dessert masterpiece.
- Customizable: Optional cream cheese and roasted peanuts let you dial in tang or crunch to match your mood.
- Crowd‑Pleaser: Kids love the peanut butter, adults love the sophistication of the pie crust notes—everyone’s happy.
- Make‑Ahead Potential: Crush the crackers and store them airtight; the shake stays fresh for days.
- Ingredient Quality: Using premium vanilla ice cream and real peanut butter elevates the entire experience.
Alright, let's break down exactly what goes into this masterpiece...
Inside the Ingredient List
The Flavor Base
Vanilla ice cream is the silent hero here. Its buttery richness provides the perfect canvas for the bold chocolate and peanut butter notes. If you opt for a cheap, overly sweet ice cream, the shake will taste like candy floss and lose its depth. I recommend a brand that uses real vanilla beans; you’ll taste the difference in every sip.
Milk, preferably whole, adds that dreamy silkiness that lets the flavors glide across your palate. Whole milk contributes fat, which carries flavor, while 2% or almond milk can lighten the texture if you’re watching calories. Don’t skimp on the milk—too little and the shake will be a dense, icy blob; too much and you’ll drown the flavor.
The Texture Crew
Peanut butter is the star of the show, delivering that unmistakable nutty richness. Creamy peanut butter blends effortlessly, while chunky adds surprise bursts of texture. If you’re allergic to peanuts, almond butter works as a decent substitute, but you’ll lose the signature “peanut‑pie” vibe.
Graham crackers are the secret weapon that gives you that pie‑crust vibe. When toasted and crushed, they add a buttery crunch that mirrors the flaky bottom of a classic chocolate‑peanut‑butter pie. Skipping this step is the biggest mistake most recipes make; you’ll end up with a smooth shake that lacks the signature bite.
The Unexpected Star
Chocolate syrup brings the deep cocoa richness that ties the whole composition together. A high‑quality syrup with real cocoa and a touch of vanilla will swirl through the shake like a glossy river of decadence. If you’re feeling adventurous, make a quick homemade sauce by melting dark chocolate with a splash of cream.
Optional cream cheese adds a subtle tang that cuts through the sweetness, mimicking the cream cheese layer found in many chocolate‑peanut‑butter pies. Just a tablespoon or two is enough to elevate the flavor without making the shake taste like a cheesecake.
The Final Flourish
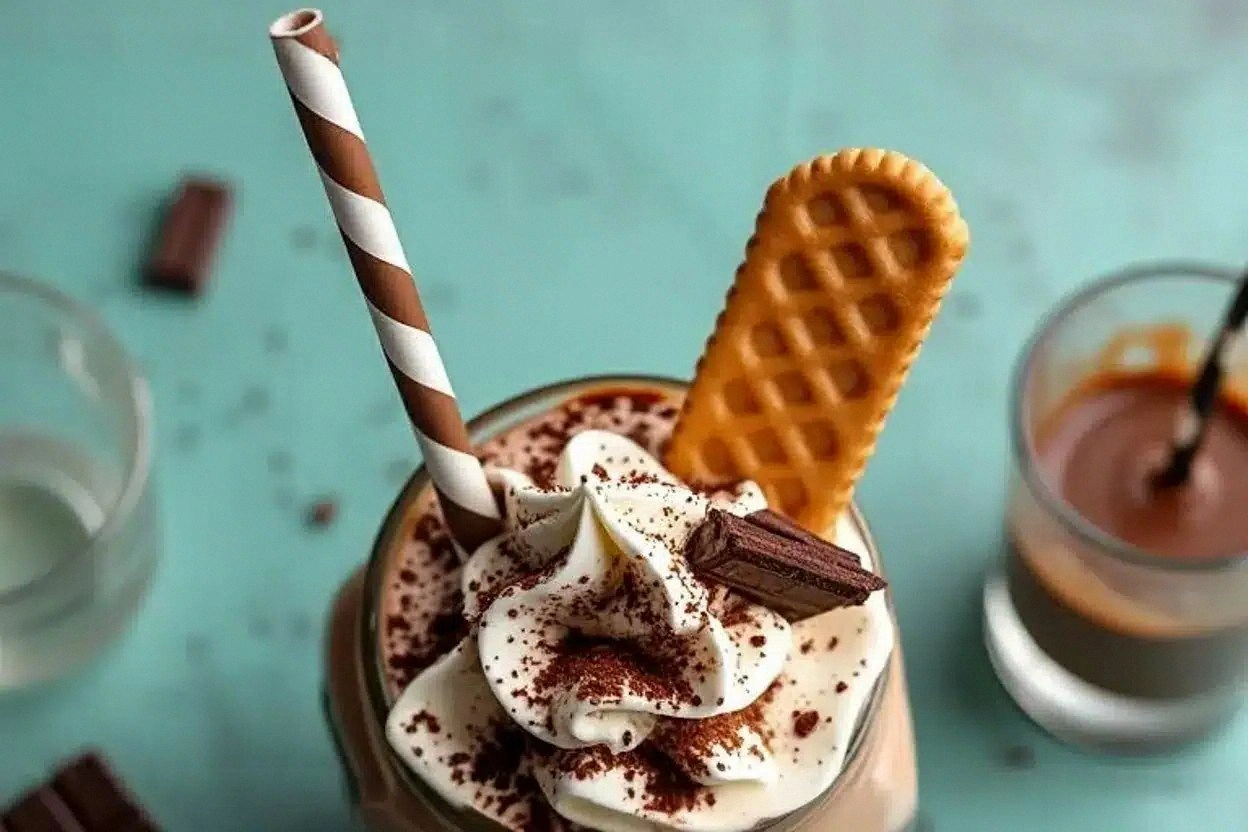
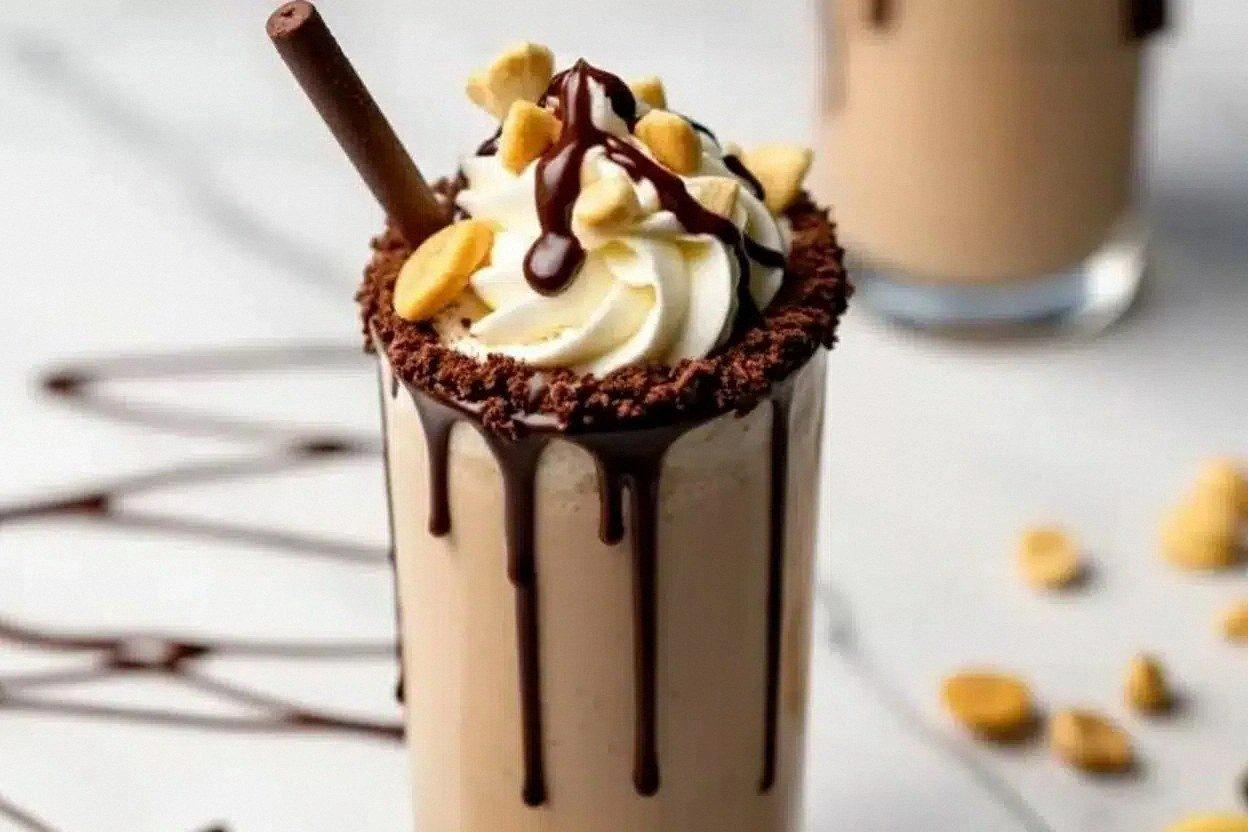
Whipped cream crowns the shake with a light, airy finish that balances the dense, rich base. You can use store‑bought, but homemade whipped cream (sweetened with a pinch of sugar and a dash of vanilla) adds an extra layer of authenticity. Mini chocolate chips or chopped chocolate sprinkle on top for that final crunch and visual sparkle.
Roasted peanuts, when used as a garnish, amplify the peanut flavor and add a satisfying crunch that mirrors the graham cracker crumbs. If you’re allergic or simply don’t like peanuts, toasted sunflower seeds make a decent alternative.
Everything's prepped? Good. Let's get into the real action...
The Method — Step by Step
First, toast the graham crackers. Heat a dry skillet over medium heat, add the crackers, and stir constantly for 2‑3 minutes until they turn a light golden brown and emit a nutty aroma. Transfer them to a plate and let them cool, then crush them with a rolling pin or the back of a spoon until you have a fine, buttery crumb. Pro tip: If you want extra depth, sprinkle a pinch of sea salt over the crumbs while they’re still warm.
While the crackers cool, measure out your liquid ingredients. Pour 1 cup of whole milk into the blender jug, then add ¼ cup of chocolate syrup. The milk should be cold; if it’s too warm, the shake will become watery. Give it a quick swirl with a spoon to combine the syrup and milk before the next step.
Next, add the creamy components. Scoop 2 cups of high‑quality vanilla ice cream into the blender, followed by ½ cup of creamy peanut butter. If you love extra peanut punch, feel free to add a tablespoon more, but remember the shake will thicken.
Now for the optional tang—add 2 tablespoons of softened cream cheese. This step is pure magic; the cream cheese melts into the blend, giving the shake a silky, slightly tangy undertone that mirrors a real pie filling. If you’re not a fan of tang, skip this step and the shake will still be delicious.
Secure the lid and blend on medium speed for about 30 seconds. Listen for the low hum; this is the sound of flavors marrying. Stop the blender and scrape down the sides with a spatula to ensure all the peanut butter and chocolate syrup are fully incorporated. If the mixture looks too thick, add a splash of milk—no more than ¼ cup.
Once the base is perfectly smooth, add the toasted graham cracker crumbs. Pulse the blender a few times—just enough to swirl the crumbs through the shake without pulverizing them into dust. You should see speckles of golden crumb floating like tiny islands.
Pour the shake into chilled glasses. The glass should be frosted for that extra “wow” factor; a quick dip in the freezer for five minutes does the trick. Top each glass with a generous dollop of whipped cream, then sprinkle mini chocolate chips and, if you like, a handful of roasted peanuts. The final garnish adds a satisfying crunch and visual pop that makes the shake look as good as it tastes.
Serve immediately with a straw and a long spoon. The first sip should hit you with a wave of chocolate, followed by the creamy peanut butter, and end with that delightful crunch of graham crackers. If you’re feeling extra indulgent, drizzle a little more chocolate syrup over the whipped cream before serving. That’s it — you did it. But hold on, I've got a few more tricks that'll take this to another level...
Insider Tricks for Flawless Results
The Temperature Rule Nobody Follows
Never blend ice cream straight from the freezer if you want a silky texture. Let the ice cream sit at room temperature for 5‑7 minutes; this softens it just enough to blend without turning into a soupy mess. The result is a shake that stays thick even after a few minutes in the glass. I once tried to skip this step—my shake turned into a milk‑soup, and I learned my lesson the hard way.
Why Your Nose Knows Best
When you’re blending, pause and take a whiff. If you smell a faint buttery note from the toasted graham crackers, you’re on the right track. If the aroma is too sweet or overly chocolatey, you may have added too much syrup. Trust your nose; it’s a more reliable gauge than a timer.
The 5‑Minute Rest That Changes Everything
After blending, let the shake sit for exactly five minutes before serving. This short rest allows the flavors to meld, creating a more harmonious taste. It also lets the crushed graham crackers absorb a tiny bit of moisture, softening them just enough to stay crunchy without turning soggy. I’ve seen people rush straight to the glass and miss out on that subtle flavor marriage.
Garnish Geometry
When adding whipped cream, use a piping bag or a zip‑top bag with a corner cut off. This gives you a controlled swirl that looks professional and prevents the whipped cream from sliding off the glass. Finish with a drizzle of chocolate syrup in a criss‑cross pattern for that Instagram‑ready finish.
The Ice‑Cold Straw Secret
Run your straw through a quick dip in the freezer for 10 minutes. A cold straw keeps the shake from warming up as you sip, preserving that thick, indulgent texture from the first sip to the last. It’s a tiny detail that makes a world of difference, especially on hot summer days.
Creative Twists and Variations
This recipe is a playground. Here are some of my favorite ways to switch things up:
Banana Peanut Butter Blast
Add one ripe banana to the blend for a natural sweetness and a subtle fruit undertone. The banana pairs beautifully with the peanut butter, creating a flavor reminiscent of a classic PB&J smoothie. Top with a few banana slices for extra visual appeal.
Mocha Madness
Swap half of the chocolate syrup for a shot of espresso or strong cold brew. The coffee adds a bitter edge that balances the sweetness, turning the shake into a sophisticated after‑dinner treat. Garnish with a dusting of cocoa powder for that café vibe.
Salted Caramel Crunch
Drizzle salted caramel sauce over the whipped cream and sprinkle flaky sea salt on top. The salty‑sweet contrast elevates the shake to a gourmet level, making it perfect for special occasions. Use a pinch of flaky salt rather than table salt to keep the texture interesting.
Vegan Velvet
Replace the vanilla ice cream with a high‑quality coconut or oat‑based ice cream, use almond milk, and opt for a plant‑based peanut butter. The result is a dairy‑free version that still delivers that rich, creamy mouthfeel. Top with coconut whipped cream for a tropical twist.
Spicy Peanut Heat
Add a pinch of cayenne pepper or a few drops of sriracha to the blender for a subtle heat that cuts through the sweetness. This surprise kick is perfect for adventurous eaters who love a little zing. Balance the spice with an extra drizzle of chocolate syrup.
Storing and Bringing It Back to Life
Fridge Storage
If you have leftovers, transfer the shake to an airtight glass jar and store it in the refrigerator for up to 24 hours. Before serving, give it a vigorous shake or stir to reincorporate any settled crumbs. Adding a splash of cold milk (about 2‑3 tbsp) will revive the texture.
Freezer Friendly
For longer storage, pour the shake into a freezer‑safe container, leaving a little headspace for expansion, and freeze for up to 2 weeks. When you’re ready to enjoy it, let it thaw in the fridge for 4‑6 hours, then blend briefly with a splash of milk to restore its silky consistency.
Best Reheating Method
If you prefer a warm, dessert‑like version, gently heat the shake in a saucepan over low heat, stirring constantly, until it reaches a pourable consistency. Add a tiny splash of water (about 1‑2 tbsp) before heating; the steam will bring back that fresh‑blended feel without turning it into a sauce. Serve warm with a dollop of whipped cream for a cozy nightcap.