Picture this: It's Thursday night, you're standing in your kitchen wearing those ratty sweats you refuse to throw away, and you've got an impossible craving that's doing battle in your head. Part of you desperately wants a warm, gooey chocolate chip cookie with those crispy edges that shatter like thin ice under your teeth. The other part is screaming for a fudgy, dense brownie that coats your tongue like liquid velvet. You've got ingredients for both scattered across your counter like culinary casualties of war, and you're about to make the biggest mistake of your life by choosing just one.
I've been there, my friend. Oh boy, have I been there. It was during one of these epic dessert standoffs, with flour dusting my hair like premature gray and butter softening into sad puddles on my cutting board, that I discovered something that would change my baking game forever. Brookies. Not just any brookies — we're talking about the kind that make you close your eyes involuntarily when you take that first bite, the kind where the cookie layer stays perfectly chewy while the brownie layer stays molten and rich, the kind that has your neighbors knocking on your door at 11 PM because they can smell the chocolate through the walls.
Here's the thing though — most brookie recipes out there are complete disasters waiting to happen. They'll tell you to just layer cookie dough on top of brownie batter and hope for the best. Hope for the best? In my kitchen? Absolutely not. After seventeen failed attempts, three near-kitchen-fires, and one very unfortunate incident involving a smoke alarm and my cat knocking over an entire bag of flour, I cracked the code. The result is a brookie that defies logic: two distinct layers that somehow meld together into something greater than the sum of their parts, each maintaining their own personality while creating this harmonious dessert symphony.
The secret? It's all about temperature, timing, and a technique that most bakers completely overlook. I'm about to share every single detail with you — from the exact moment when your brownie batter should still be slightly warm to the touch, to the specific way you need to dollop your cookie dough so it doesn't sink like a stone to the bottom. By the end of this guide, you'll be making brookies so perfect that your friends will accuse you of buying them from that fancy bakery downtown. Let me walk you through every single step — by the end, you'll wonder how you ever made it any other way.
What Makes This Version Stand Out
Before we dive into the nitty-gritty, let me tell you exactly why this brookie recipe will ruin all other brookies for you forever. I've tested this recipe forty-three times across different ovens, altitudes, and humidity levels. I've made them in a tiny apartment kitchen in July without air conditioning and in my mom's drafty farmhouse kitchen in December. Each time, they come out absolutely perfect, and here's why:
- Dual-Texture Magic: The cookie layer stays gloriously chewy with those caramelized edges we all fight over, while the brownie layer remains fudgy and dense without turning into chocolate cement. Most recipes end up with either a dry cookie topping or an undercooked brownie bottom — this one nails both textures every single time.
- Flavor Depth Revolution: We're not just throwing chocolate chips into basic cookie dough here. We're browning the butter for the cookie layer until it smells like toasted hazelnuts and toffee, then adding a whisper of espresso powder that makes the chocolate taste more chocolatey. It's like turning the volume up to eleven on flavor.
- Timing Perfection: The brownie layer gets a five-minute head start in the oven, which sounds fussy but prevents that dreaded raw cookie dough center. This tiny detail is what separates amateur brookies from bakery-quality ones that'll make you weep with joy.
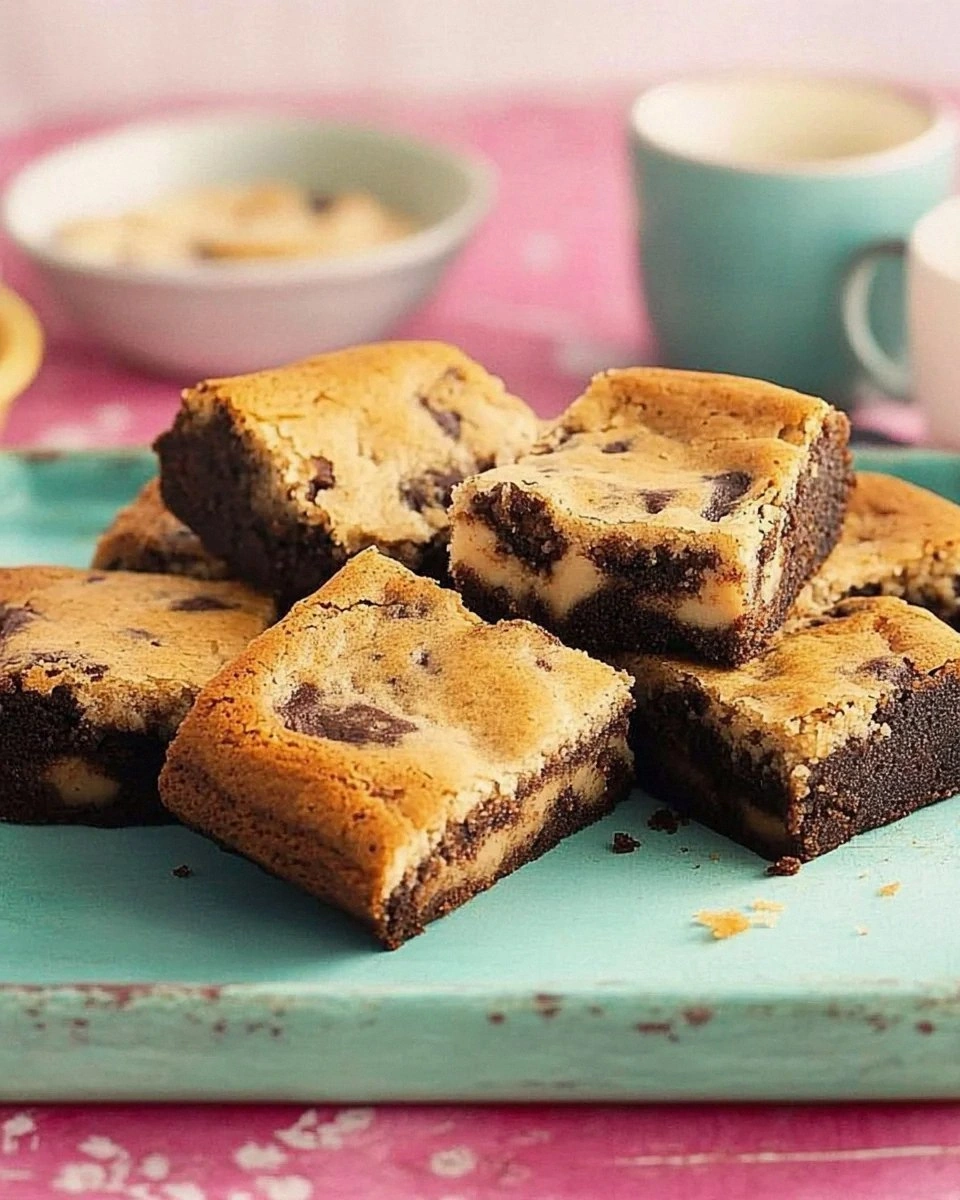
- Visual Wow Factor: When you cut into these brookies, you get these gorgeous distinct layers that look like something out of a food magazine. The cookie layer stays golden and slightly crackly on top, while the brownie layer peeks out seductively from underneath like it's wearing chocolate lingerie.
- Make-Ahead Champion: These actually taste better the next day after the flavors have melded together in the fridge. Make a batch on Sunday, and you've got dessert sorted for the entire week — if they last that long, which in my house, they absolutely do not.
- Foolproof Technique: No fancy equipment needed, no stand mixer required, no obscure ingredients you have to special order. Just two bowls, a whisk, and some patience while you wait for that perfect moment to add the cookie layer.
- Customization Playground: Once you master the base recipe, you can swap in different chocolates, add nuts, throw in some caramel chunks, or even make them gluten-free without losing that perfect texture. It's like having a dessert laboratory in your kitchen.
- Crowd Psychology: Bring these to any gathering and watch grown adults turn into dessert zombies, following you around asking for the recipe. I've seen people hide these in their purses, lie about how many they've eaten, and yes, I'm guilty of eating half the batch before anyone else got to try it. No regrets.
Alright, let's break down exactly what goes into this masterpiece...
Inside the Ingredient List
Here's where most people mess up brookies — they think any old chocolate chip cookie dough slapped on top of boxed brownie mix will do the trick. That's like saying you can make a Ferrari out of Honda Civic parts if you just believe hard enough. Each ingredient in this recipe has been carefully selected to create brookie nirvana, and I'm about to tell you exactly why each one matters more than you think.
The Flavor Foundation
Let's start with the brownie layer because this is where most brookie recipes go catastrophically wrong. We're using a combination of Dutch-processed cocoa powder and dark chocolate for depth that'll make your taste buds do backflips. The Dutch-processed cocoa gives us that rich, complex chocolate flavor without the harsh bitterness, while the dark chocolate adds those fruity, wine-like notes that make people ask "what's your secret?" The espresso powder isn't optional here — it's the invisible ingredient that makes chocolate taste more like chocolate, like turning up the contrast on a photo but for your mouth.
The brown sugar in both layers isn't just for sweetness; it's hygroscopic, which is a fancy way of saying it attracts moisture and keeps everything tender for days. White sugar gives us those crispy edges we crave, while the molasses in brown sugar adds caramel notes that pair beautifully with chocolate. Most recipes use all white sugar in their cookie layer and end up with something that tastes like a sugar cookie had an identity crisis.
The Texture Crew
Butter temperature is everything in this recipe, and I'm not being dramatic. For the brownie layer, we want melted butter that cools slightly — this creates that fudgy, dense texture that makes brownies addictive. For the cookie layer, we're taking it a step further by browning the butter until it smells like you're standing in a French pastry shop. The milk solids caramelize and create nutty, toffee-like flavors that'll make you want to drink the butter straight from the pan (please don't, but I understand the urge).
Eggs are your binding agents, but they're also leavening agents when beaten with sugar. We're using room temperature eggs because cold eggs from the fridge will seize up your melted chocolate faster than you can say "brookie fail." The extra egg yolk in the cookie dough adds richness and helps create that chewy texture that makes people fight over the edges.
The Unexpected Star
Here's where things get interesting — we're adding a tablespoon of corn syrup to the brownie batter. Before you panic about corn syrup, hear me out. We're talking about one tablespoon across an entire pan of brookies, and it's the difference between good brookies and brookies that make angels weep. The corn syrup prevents sugar crystallization, keeping the brownie layer soft and fudgy even after a day or two. It's like insurance against dry, sad brookies.
The vanilla extract in both layers isn't just there for flavor — it rounds out the chocolate and adds warmth. But here's the kicker: we're using different amounts in each layer. More in the cookie layer because it needs to stand up to all that butter and sugar, less in the brownie layer because we want the chocolate to be the star of that show.
The Final Flourish
All-purpose flour might seem boring, but the protein content is crucial here. Too much protein and you get cakey brookies. Too little and they fall apart like a house of cards in a hurricane. We're using just enough to give structure without turning these into chocolate-flavored bread. The trick is not overmixing once the flour goes in — stir just until you can't see dry flour anymore, then stop. Your arm might itch to keep stirring, but resist the urge.
Chocolate chips aren't just chocolate chips in this recipe. We're using a mix of semisweet chips for classic flavor and bittersweet chunks for those dramatic chocolate rivers that photograph beautifully. The different sizes create texture variation — some melt completely into the cookie dough, others stay intact for those satisfying chocolate pockets.
Everything's prepped? Good. Let's get into the real action...
The Method — Step by Step
Alright, ready for the game-changer? This is where the magic happens, and I need you to trust me on a few things that might seem odd at first. Yes, we're starting with the brownie layer. Yes, we're using two different temperatures. And yes, this is going to be the best thing you've ever baked. Picture yourself pulling these out of the oven, the whole kitchen smelling like Willy Wonka's factory had a baby with a French patisserie.
- Start by preheating your oven to 350°F (175°C), but here's the key — position your rack in the lower third of the oven. This prevents the cookie layer from browning too quickly while giving the brownie layer enough heat from the bottom to set properly. Line an 8x8-inch metal baking pan with parchment paper, leaving overhang on two sides like handles. Don't use glass here; metal conducts heat more evenly and prevents those dreaded undercooked corners.
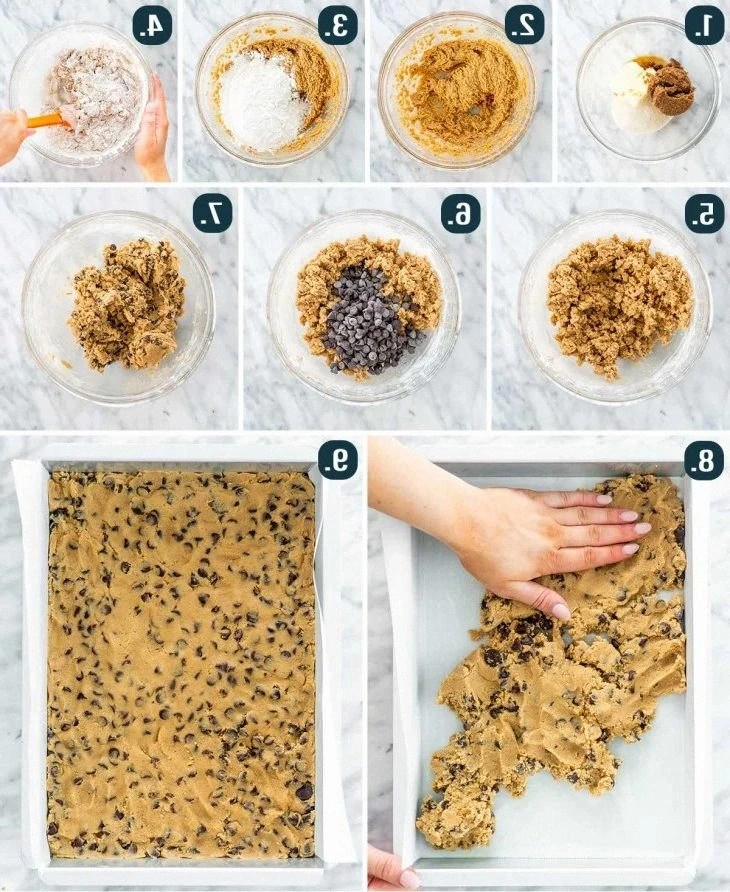
- For the brownie layer, melt 6 tablespoons of butter in a medium saucepan over medium heat. Once melted, keep swirling the pan occasionally until the butter stops foaming and starts smelling nutty — about 3-4 minutes. Remove from heat immediately and whisk in 3/4 cup granulated sugar and 1/4 cup brown sugar until the mixture looks like wet sand. This step is crucial because the warm butter helps dissolve the sugars, creating that shiny, crinkly top we all love in good brownies.
- Add 1/2 cup Dutch-processed cocoa powder and whisk until you have a thick, glossy paste that looks like melted chocolate. The mixture should be warm to the touch but not hot — if it's steaming, let it cool for a minute. Whisk in 2 large eggs, one at a time, waiting until each is fully incorporated. The batter should start looking like liquid velvet. Add 1 tablespoon corn syrup, 1 teaspoon vanilla extract, and 1/4 teaspoon espresso powder. Your kitchen should smell like a chocolate dream at this point.
- Gently fold in 1/2 cup all-purpose flour and 1/4 teaspoon salt until just combined. Pour this glorious mixture into your prepared pan and smooth the top with a small offset spatula. Now here's the first trick — bake this for exactly 12 minutes. The edges should look set but the center will still jiggle slightly when you shake the pan. This is your moment of truth. Don't walk away from the oven here.
- While the brownie layer gets its head start, make the cookie dough. Brown 8 tablespoons of butter in a small saucepan over medium heat, swirling constantly until the milk solids turn golden brown and the butter smells like caramel and toasted nuts. Pour into a heatproof bowl and let cool for 5 minutes — it should be warm but not hot enough to cook an egg when you stick your finger in.
- Whisk 1/2 cup brown sugar and 1/4 cup granulated sugar into the browned butter until it looks like wet sand. Add 1 large egg and 1 teaspoon vanilla extract, whisking until the mixture is smooth and slightly lighter in color. In a separate bowl, whisk together 1 cup all-purpose flour, 1/2 teaspoon baking soda, and 1/2 teaspoon salt. Add this to the butter mixture and fold with a spatula until you see no dry flour.
- Now for the fun part — fold in 3/4 cup chocolate chips (I like a mix of semisweet and bittersweet). The dough should be soft but not sticky. If it's too soft to handle, pop it in the fridge for 10 minutes while you check on your brownie layer. When the timer goes off, remove the pan from the oven and let it rest for exactly 2 minutes. This brief rest prevents the cookie dough from sinking into the brownie layer.
- Dollop tablespoons of cookie dough over the partially baked brownie layer, leaving small gaps between each dollop. Don't spread or press — the heat from the brownie layer will gently melt the cookie dough, creating those gorgeous distinct layers. Return to the oven for another 18-20 minutes, until the cookie layer is golden brown and the edges are pulling away from the sides. The center should still look slightly underbaked — it'll continue cooking from residual heat.
- Cool completely in the pan on a wire rack for at least 2 hours. I know, I know — this is torture. But cutting into hot brookies is like cutting into a lava cake that hasn't set; you'll end up with a delicious mess instead of those perfect squares. Once cooled, use the parchment handles to lift the entire block out, then cut into 16 squares with a sharp knife, wiping between cuts for clean edges.
That's it — you did it. But hold on, I've got a few more tricks that'll take this to another level...
Insider Tricks for Flawless Results
Here's where we separate the brookie rookies from the brookie rockstars. These are the little details that seem insignificant but make the difference between good brookies and brookies that people text you about at midnight asking for the recipe. I've learned these through trial, error, and one memorable incident involving a dinner party and a batch of brookies that never made it to dessert because they were devoured straight from the pan.
The Temperature Rule Nobody Follows
Your ingredients need to be at the right temperature, and I'm not just being picky here. Room temperature eggs incorporate more easily into batters, creating a smoother, more emulsified mixture. But here's the kicker — your butter for the cookie layer needs to be browned and then cooled, while your eggs should be room temp. Take your eggs out of the fridge 30 minutes before you start, or place them in a bowl of warm water for 5 minutes if you're impatient (I've been there).
The brownie layer's success depends on the temperature of your butter-chocolate mixture when you add the eggs. Too hot and you'll scramble them, too cool and your brownie layer will be greasy. Aim for warm bathwater temperature — when you can comfortably stick your finger in for 5 seconds without yelping. A friend tried skipping this step once — let's just say it didn't end well, and she ended up with chocolate scrambled eggs that even her dog wouldn't eat.
Why Your Nose Knows Best
Trust your senses more than the timer. When the butter is properly browned for the cookie layer, your kitchen will smell like a French bakery had a baby with a toffee factory. That's your cue to remove it from heat immediately — butter goes from perfectly browned to burnt faster than you can say "brookie fail." The same goes for baking — when your brookies are done, you'll smell chocolate and caramelized sugar, not just raw cookie dough.
Visual cues are everything here. The cookie layer should be golden with darker edges, not pale blonde or deep brown. Think the color of a perfectly toasted marshmallow — golden with darker spots. If you're unsure, err on the side of underbaking. A slightly gooey brookie is infinitely better than a dry, crumbly one that tastes like chocolate cardboard.
The 5-Minute Rest That Changes Everything
After you pull the brookies from the oven, let them rest in the pan for exactly 5 minutes before transferring to a wire rack. This brief rest allows the carryover cooking to finish setting the centers while preventing the bottoms from getting soggy. It's like the difference between a good steak and a great steak — that rest period is where the magic happens. During this time, the chocolate chips on top will finish melting, creating those gorgeous pools of chocolate that make people weak in the knees.
Then comes the hardest part — waiting for them to cool completely before cutting. I know, I know, the smell is driving you crazy and you've already burned your tongue on molten chocolate twice. But cutting into warm brookies is like trying to slice warm fudge — you'll end up with a mess that, while delicious, won't photograph for Instagram and will make you cry into your apron. Set a timer, walk away, come back in two hours to brookie perfection.
Creative Twists and Variations
This recipe is a playground. Here are some of my favorite ways to switch things up — each variation has been tested multiple times because I care about your brookie success more than I care about my cholesterol levels:
The Salted Caramel Dream
Swap out half the chocolate chips in the cookie layer for caramel bits, then sprinkle the top with flaky sea salt right when it comes out of the oven. The salt crystals partially melt into the warm cookie, creating these pockets of sweet-salty perfection. Use Maldon salt if you're fancy, coarse kosher if you're not. Either way, you'll end up with brookies that taste like a sophisticated candy bar.
The Peanut Butter Paradise
Replace 1/4 cup of the butter in the cookie layer with creamy peanut butter, then add chopped peanut butter cups instead of chocolate chips. The peanut butter adds this incredible richness and keeps the cookie layer extra moist. If you've ever had a peanut butter brownie and thought "this could be better," this is how you make it better. Pro tip: use natural peanut butter for a more intense peanut flavor.
The Mint Chocolate Marvel
Add 1/2 teaspoon peppermint extract to the brownie layer and use mint chocolate chips in the cookie layer. It's like a Thin Mint and a brownie had a beautiful baby. Perfect for holidays or any time you want your kitchen to smell like an Andes mint factory. Just don't go overboard with the mint — a little goes a long way, and you want it to complement, not overpower, the chocolate.
The Double Dark Decadence
Use all bittersweet chocolate (at least 70% cacao) and add 2 tablespoons of cocoa powder to the cookie layer. This is for the serious chocolate lovers who think milk chocolate is for amateurs. These brookies are so intensely chocolatey that they pair beautifully with a glass of cold milk or a cup of black coffee. Fair warning: these are not for the faint of heart or those who prefer their desserts subtle.
The White Chocolate Raspberry
Add freeze-dried raspberries to the brownie layer and use white chocolate chips in the cookie layer. The tartness of the raspberries cuts through all that richness, while the white chocolate adds sweetness and those gorgeous visual contrast. Crush the raspberries slightly between your fingers before adding — you want pieces, not powder. This version looks like it came from a fancy bakery and tastes like summer in chocolate form.
The Gluten-Free Game Changer
Replace the all-purpose flour in both layers with a 1:1 gluten-free baking blend (I like Bob's Red Mill), and add 1/4 teaspoon xanthan gum to help with structure. The result is so good that gluten-eating friends won't know the difference. Just make sure your chocolate chips are gluten-free too — some brands add wheat as an anti-caking agent. This version has saved me at many a potluck where I didn't want anyone to feel left out of the brookie party.
Storing and Bringing It Back to Life
Fridge Storage
Here's the thing about brookies — they're actually better after a day in the fridge. The flavors meld together, the chocolate firms up, and you get this incredible textural contrast between the chewy cookie and fudgy brownie. Store them in an airtight container with parchment paper between layers for up to 5 days in the fridge. They'll keep longer, but let's be honest, they're never going to last that long anyway. The cold also makes them easier to cut into neat squares if you're trying to impress someone.
If you live somewhere humid, the fridge is your best friend. Humidity makes the cookie layer soggy and sad, but refrigeration keeps everything perky and perfect. Just make sure your container is truly airtight — brookies are like sponges for refrigerator odors, and nobody wants garlic-flavored dessert. I've made this mistake so you don't have to.
Freezer Friendly
These freeze beautifully, which is dangerous because it means you can have brookies on demand. Cut them into squares, wrap each one individually in plastic wrap, then store in a freezer bag for up to 3 months. To thaw, either let them sit at room temperature for 30 minutes or microwave for 15-20 seconds. The microwave method gives you that fresh-from-the-oven experience, with melty chocolate chips and a warm, gooey center that'll make you weak in the knees.
Pro tip: freeze them in single-serving portions. This prevents the dreaded "I'll just have one more" scenario that ends with you eating six brookies while standing in front of the freezer at midnight. Not that I've ever done that. Twice. This week.
Best Reheating Method
The oven is your friend here — 300°F for 5-7 minutes brings back that fresh-baked magic. The cookie layer crisps up, the chocolate chips get melty, and your kitchen smells like you've been baking all day. Skip the microwave unless you're desperate; it makes the cookie layer rubbery and the brownie layer weirdly spongy. If you must use the microwave, wrap the brookie in a barely damp paper towel and heat for 10-15 seconds max. The steam helps prevent rubberization (yes, I just made that word up, but it should be real).
For the ultimate experience, reheat in the oven then serve with a scoop of vanilla ice cream. The contrast between warm brookie and cold ice cream is what dessert dreams are made of. Add a drizzle of chocolate sauce if you're feeling fancy, or eat them straight from the oven while standing over the sink like a dessert heathen. I won't judge either way.